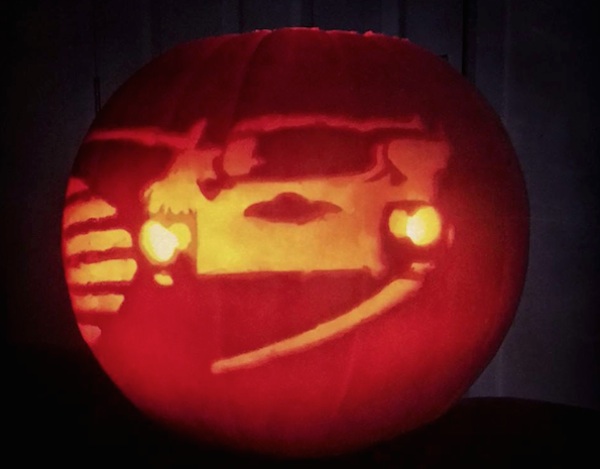
It’s Porsche pumpkin carving time again and we’re back at it. This year, we decided to tackle our logo and we changed things up by using a foam pumpkin vs. the real thing (we explain why below). If you want to carve your very own Porsche Pumpkin then you’ve come to the right place. Below we’ll outline the tools and techniques you’ll need to make it happen. We even explain how to make your own template or you can use one of the ones we provide. Enjoy!
The Tools And Accessories You’ll Need To Carve A Porsche Pumpkin
- A Pumpkin: Traditionalists will want a real pumpkin and I don’t blame you. We’ve used them since we were kids. This year, however, we went with a foam pumpkin like this one. Not only were the results better, you can’t smash this one.
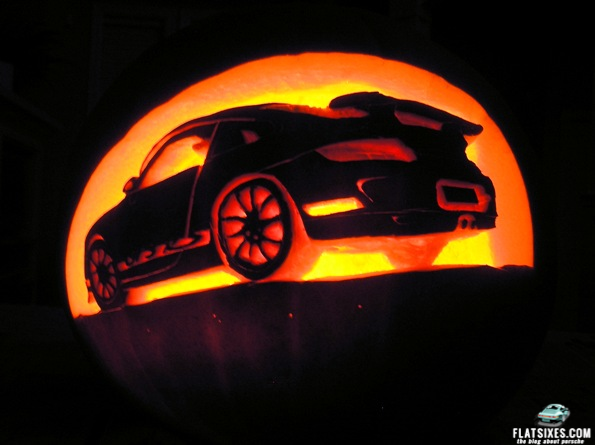
- Porsche Pumpkin Carving Template: You’ll need a template to copy your design onto your pumpkin. You can make your own using our instruction below. Or, you can use our very own Porsche 993 Pumpkin Carving Template or our Porsche GT3 Pumpkin Carving Template.
- Carving Tools: You can carve your Porsche Pumpkin by hand using inexpensive tools like these (they are what we used to make our first Porsche Pumpkin years ago). Or, for just a few bucks more you can upgrade for quality to a set like this one with a wooden handle. Lastly, if you’re very adventurous or more advanced, you’ll want to try a rotary tool. There are cheap ones and there are more expensive ones. You get what you pay for. This is the ultimate way to carve your Porsche Pumpkin.
- Battery Powered Tea Light Or Candle: Like choosing a real pumpkin or a foam one, this is personal choice. However, if you use a foam pumpkin you should definitely not light it with an open flame. For that reason we chose flameless tea lights like these.
- Addition Items: You’ll most likely need some type of tape, we use Scotch. A pen or pin to trace your outline and a black magic marker will come in handy when you’re done (we explain in our “advanced tips”). Don’t forget eye protection and some type of mask/respirator.
Porsche Pumpkin Carving Tips
- Be sure the pumpkin you purchase is large enough to handle the stencil/template you choose. I’ve found that a 18 to 20 lb pumpkin seems to do the trick nicely. Or, you can choose the foam pumpkin we listed above.
- If you go with a real pumpkin you’ll need to cut off the top and clean out the inside. See if you can’t convince your wife/husband or kids to bake and salt the seeds for you.
- Once you’ve printed out one of our templates, or made you own using the instructions below, you’ll want to secure it to your pumpkin as flat as possible using some type of tape. Remember, if you’re using a foam pumpkin, be sure to test the tape on the back to make sure it won’t leave a mark.
- Next, use a pen or a pin to trace or outline the black areas of your template. Remember, when you’re doing the tracing, you’ll only be carving those areas in black on your template.
- Once you’ve traced out your template, remove it. Now, using the carving tools of your choice you’ll carve the template you outlined in the step above. If you’re using a foam pumpkin we would highly recommend wearing some form of eye protection as well as a mask to avoid inhaling any particles.
- Once you’re done, clean up the mess on the inside and out and admire your handiwork.
- When it comes time to put your light in the pumpkin it’s as simple as placing it in from the top (if you’re using a real one). Or, you may need to carve a small hole in the bottom to fit your tea light if you’re using a foam pumpkin. Just turn the light over and place it against the bottom of your pumpkin. Now trace the outline of it onto the pumpkin’s surface. Lastly cut out the circle you just traced but do so just slightly smaller so your tea light will fit nice and snug and won’t fall out each time you pick it up. You might also consider carving a thumb hole along one part of the pumpkin to make turning the light on and off easier.
- Turn out the lights, take a picture of your Porsche Pumpkin and post a picture of it on our Facebook page.
5 Advanced Pumpkin Carving Tips
- Never cut anything completely through until the end, just pierce and cut the design maybe 1/4″ in. If you’re using a foam pumpkin, be sure to check the thickness before you begin.
- Be sure to plan your work. Don’t cut out the silhouette first only to realize you’ve got a lot of work to do on the shape itself; it will break off. Ask me how I know?
- Think of your picture’s colors/shading in terms of layers. You’ll be able to re-create a lot of color effects by using 3D shapes. For example, the taillight doesn’t need to be as bright as a window or open space. Try cutting in just a bit, carve it out while leaving a good bit of the flesh, you’ll be surprised how well it lights up.
- Cutting one line perpendicular and then another at 45 degrees at say 1/32″ away will let you establish things like door sills, panel gaps, etc. It doesn’t need to go deep, just has to be there.
- Lastly, think about using a black magic marker to color those areas you don’t carve. This has a the double benefit of making your carving look better in the daylight and giving sharper contrast when lit.
- Take a picture of your favorite Porsche or grab one off the web.
- Using Photoshop, Gimp, or a similar type program open the image on your computer.
- Tone down the colors until it looks similar in shading to our Porsche GT3 Pumpkin Carving Template.
- Print it out and use the instructions above and below to make your very own Porsche Pumpkin.
How To Make Your Own Porsche Pumpkin Carving Template
Other Porsche Pumpkin Carving Templates
If you do carve your own Porsche pumpkin, be sure to send us a pic or share it with us on our facebook page.
Other Porsche Blog Posts You Will Enjoy
10 Tips to Carve Your Own Porsche Pumpkin
The Picasso of Porsche Pumpkin Carvings
Extreme Porsche Pumpkin Carving
Porsches In Costume
View Comments (1)
I'm very disappointed that you used a foam (fake) pumpkin. Much of the fun in carving pumpkins is found in smashing them into a thousand little pieces.