Last year we introduced you to our newest project car, called simply “Project Boxster Clubsport”. In that first installment we found the right car, we purchased it for a song, and since then we’ve been slowly removing weight from it and installing a few upgrades. So far, we’re really happy with what the Boxster has become, but things came to a halt recently and sent us back to the drawing board. It’s an excellent Porsche, and we aim to make it just a little bit more excellent with each improvement.
Part 2 – GT3-Style Center Console Delete
Part 3 – LED license plate lights
Part 6 – Emblem Delete and Paint Correction
Part 8 – Short Shift Kit Installation
Part 10 – Big Brakes, Spacers, and Wheel Studs
Part 11 – Wheels and Michelins
Before we get started we would need to thank Michelin. As many of you know, Michelin is a long-time sponsor of FLATSIXES.com. Recently, they have generously offered to sponsor Project Boxster Clubsport as part of their involvement with our site. Please consider checking out what Michelin has to offer by clicking their banners on this page. Without Michelin’s support, and others like them, this site really wouldn’t be possible.
Part 12 –
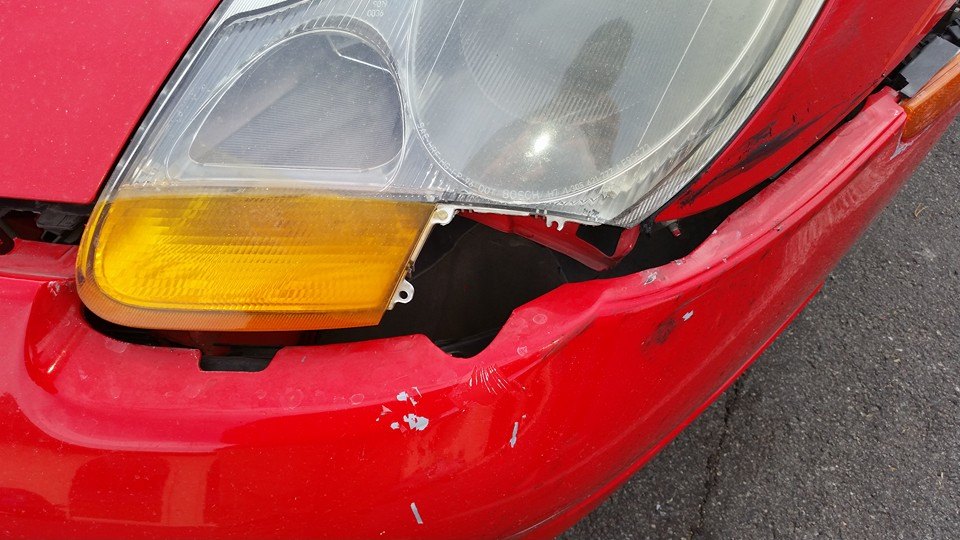
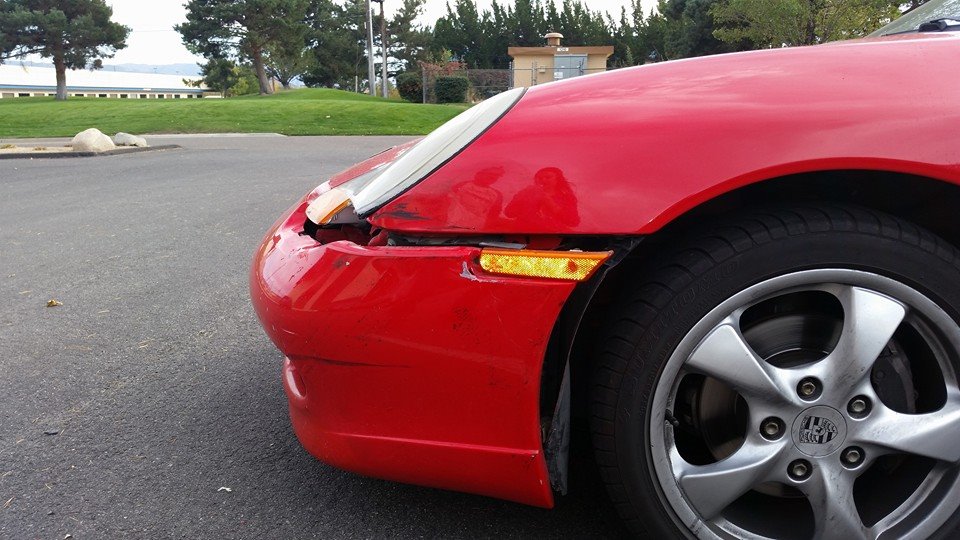
At the end of a long day at the office, the last thing I wanted to see when I went out to the parking lot was my beloved Porsche sitting damaged. Unfortunately, that’s the sight I was treated to a while ago. The rare Porsche Aerokit 1 bumper was cracked, torn from its purchase on the front of my car, laying haphazard on the bare pavement. It was a sad sight, to be sure.

How Did It Happen?
To make matters worse, it was by complete fluke that I’d parked in that space in the first place. Normally, being a responsible Porsche owner, I park as far out in the parking lot as possible so as to avoid door dings and damage from other motorists parking next to me. On this particular day, however, the maintenance crew was doing some leaf blowing when I arrived, and I opted to park in the middle of the lot to avoid them spraying rocks at my car with the leaf blower, or coating my interior with leaves and sand. While parked in the middle of the lot, the bright red sports car apparently became invisible, as it was swiped clean in the nose by a large pickup truck. At the very least, it was good of them to have left their insurance information and an apology. Regardless, this bumper is difficult to find, and a number of the underlying brackets and mounts have been shattered beyond recognition. Furthermore, the driver’s side fender is dented, and the headlight assembly has also been damaged, at least cosmetically.

What Now?
So, where before our Boxster project aimed to keep the bodywork relatively stock and looking close to factory, we’re now going to take this project in a slightly different direction. The trajectory for this project is now aimed square at the stars, and making things a bit more exciting, from an appearance standpoint. Being that we’ll need to replace at least one headlamp, and at least one fender, in addition to the front bumper, we’re allowed a few options when finalizing repairs. For the purposes of this project, we’ve settled on a pair of 996 Turbo front fenders, and a 996 GT3-style front bumper, which gives us the ability to update to the late 996 headlamps, which we find much more attractive than the original ‘fried egg’ style headlamp assembly. This is pretty involved work, but we’ll set about tackling that job in future updates. The insurance payout from the damage will cover some of the costs involved, but certainly not all of them. We’ve managed to source the bumper and headlight assemblies, but haven’t yet found a pair of fenders or headlight brackets at a reasonable cost.
So what do you think? Where would you like to see this project go from here? Once everything is installed, we’ll need to get the car painted or vinyl wrapped. Put your color preferences in the comments section below.
